W5500を使ってESP32でEthernet UDP通信する

WIZnetのW5500を使ってESP32(Arduino core for the ESP32)でUDP通信を行ってみます。
1. 準備
Aliexpress等でW5500を購入します。
1 個 USR ES1 W5500 チップ新 spi 蘭イーサネット変換 TCPIP Mod - Aliexpress.com | Alibaba グループ上の 電子部品&用品 からの 集積回路 の中

ESP32はESP32-DevKitCを使います。秋月電子で購入できます。
2. 接続
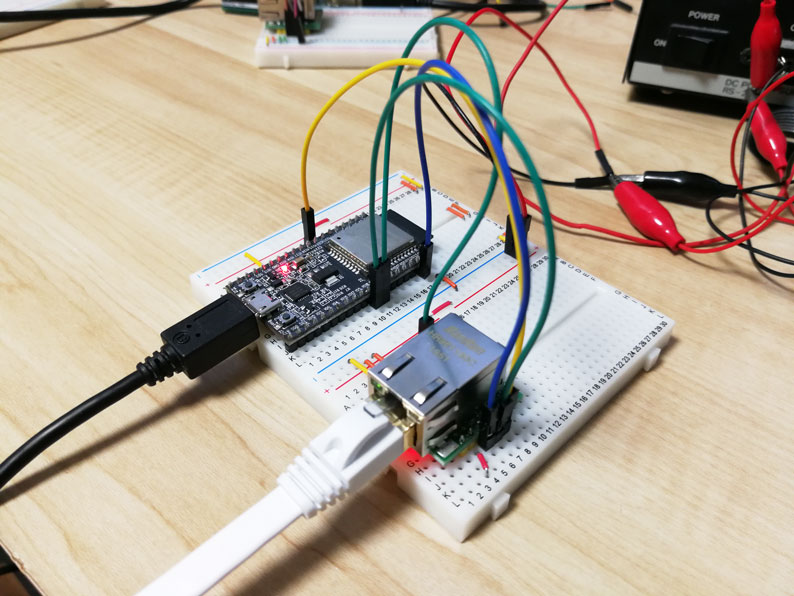
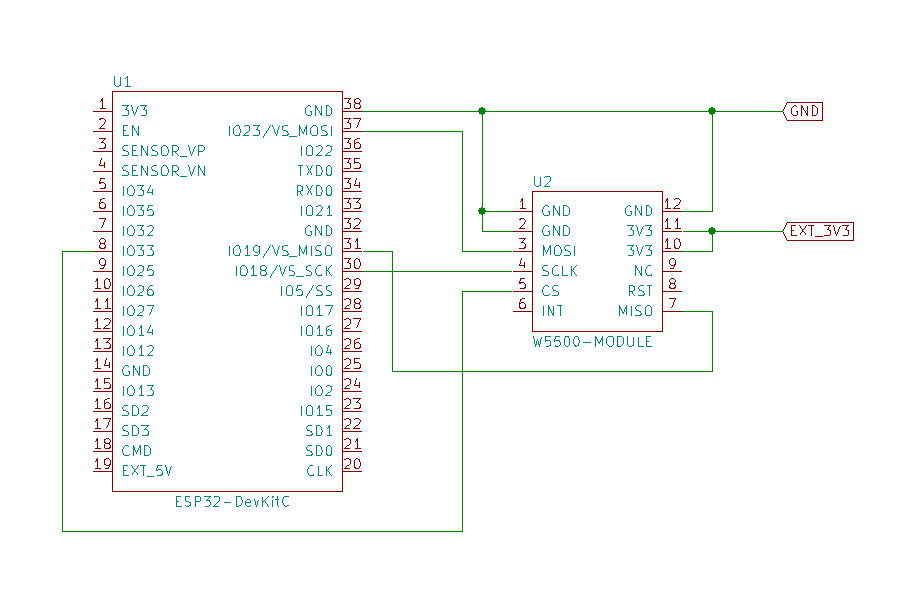
W5500とESP32を以下のように接続します。3.3Vの供給についてはW5500の消費電流が大きいためESP32から行わずに外部から加えるようにしています。
(2019.06.23追記)
ESP32-DevKitCであれば3.3Vのレギュレーターに1A以上出力可能なNCP1117を使用しているため、W5500と直接つなげても駆動できるかと思います。

| ESP32 | W5500 |
|---|---|
| IO33 | CS |
| IO23 (VS_MOSI) | MOSI |
| IO19 (VSMISO) | MISO |
| IO18 (VS_SCK) | SCLK |
| 3V3 | VCC |
| GND | GND |
データシートを見ると100M Trasmittingのときに132mA消費すると書いてあるので、外部電源は200mA以上供給できるものを用意すると良いでしょう。
products:w5500:datasheet [Document Wiki]


3. ライブラリ修正
配線が終わったらコードの書き込みに進みたいところですが、Arduino core for the ESP32 Ver 1.0.2にはEthernetを使用するためのライブラリに不備があり、コンパイルすることができません。
コンパイルできるようにするためにはArduino core for the ESP32のClient.hを修正する必要があります。 Client.hはボードマネージャを使用してインストールしてあれば以下のパスにがあります。(Windows)
C:\Users\<アカウント名>\AppData\Local\Arduino15\packages\esp32\hardware\esp32\1.0.2\cores\esp32\Client.h
テキストエディタでClient.hを開いて以下の行をコメントアウトします。
// virtual int connect(IPAddress ip, uint16_t port, int timeout) =0;
// virtual int connect(const char *host, uint16_t port, int timeout) =0;
このあたりの事情は以下のやり取りで伺い知ることができます。
- Adding ESP32 support and fix for ESP32 v 1.0.2 by kmpelectronics · Pull Request #95 · arduino-libraries/Ethernet · GitHub
- compilation error with ESP32 DIV Kit · Issue #97 · arduino-libraries/Ethernet · GitHub
- Server.h not matching Arduino API · Issue #2704 · espressif/arduino-esp32 · GitHub
- Add connect with timeout to Client class · espressif/arduino-esp32@9a9ff62 · GitHub
また、この事象によって報告されている不具合
- Problem with Ethernet.h compilation after board library update from 1.0.1 to 1.0.2 · Issue #2786 · espressif/arduino-esp32 · GitHub
- M5StackでEthernetが使えない問題 - Qiita
- Virtual functions in client.h are out of line with standard Arduino API · Issue #2755 · espressif/arduino-esp32 · GitHub
要約するとArduino core for the ESP32 Ver 1.0.2ではArduinoのEthernet.hとの互換性を意識していない実装になっているためコンパイルエラーが発生しているようです。
ここではJuraj Andrássy氏の意図を汲んで、Arduino側のライブラリを修正するのではなくArduino core for the ESP32側のライブラリを修正して進めます。
4. コード
ライブラリを修正したら、以下のコードをESP32に書き込みます。
#include <Ethernet.h>
#include <EthernetUdp.h>

byte mac[] = { 0x70, 0x69, 0x69, 0x2D, 0x30, 0x31 };

unsigned int localPort = 3001;

char packetBuffer[UDP_TX_PACKET_MAX_SIZE];
char ReplyBuffer[] = "acknowledged";

EthernetUDP Udp;

void setup() {
  Serial.begin(115200);
  Serial.println("starting...");

  Ethernet.init(33);// CS pin 33
  Ethernet.begin(mac);// use DHCP

  // Check for Ethernet hardware present
  if (Ethernet.hardwareStatus() == EthernetNoHardware) {
    Serial.println("Ethernet shield was not found.  Sorry, can't run without hardware. :(");
    while (true) {
      delay(1); // do nothing, no point running without Ethernet hardware
    }
  }
  if (Ethernet.linkStatus() == LinkOFF) {
    Serial.println("Ethernet cable is not connected.");
  }

  Serial.print("IP: ");
  Serial.println(Ethernet.localIP());

  Udp.begin(localPort);
}

void loop() {
  // if there's data available, read a packet
  int packetSize = Udp.parsePacket();
  if (packetSize) {
    Serial.print("Received packet of size ");
    Serial.println(packetSize);
    Serial.print("From ");
    IPAddress remote = Udp.remoteIP();
    for (int i=0; i < 4; i++) {
      Serial.print(remote[i], DEC);
      if (i < 3) {
        Serial.print(".");
      }
    }
    Serial.print(", port ");
    Serial.println(Udp.remotePort());

    // read the packet into packetBufffer
    Udp.read(packetBuffer, UDP_TX_PACKET_MAX_SIZE);
    Serial.print("Contents: ");
    Serial.println(packetBuffer);

    // send a reply to the IP address and port that sent us the packet we received
    Udp.beginPacket(Udp.remoteIP(), Udp.remotePort());
    Udp.write(ReplyBuffer);
    Udp.endPacket();
  }
  delay(10);
}
MACアドレスは環境に合わせて変更してください。IPアドレスの設定はDHCPを使っていますが、Ethernet.begin()の引数にIPアドレスやgatewayを指定することで固定IPを設定することもできます。
固定IPで設定する際のdns・gateway・subnetはデフォルト値が設定されているため、MACアドレスとIPアドレスだけで動作する場合がありますが、指定しないと動作しなかったり通信が不安定だったりするため、面倒でも全て指定した方が良いでしょう。Ethernet.begin()の詳細は以下の公式リファレンスから確認できます。
5. 実行
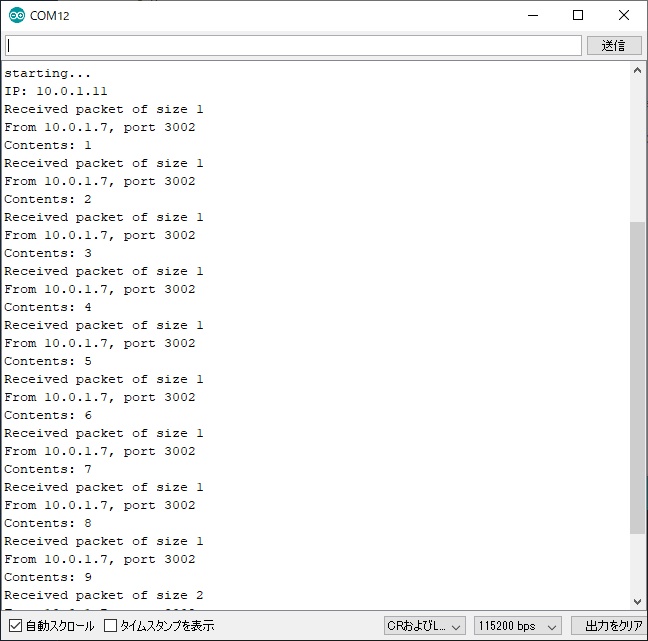
シリアルモニタでログを確認します。通信相手はNode.jsを使うと簡単に用意することができます。正常に動作していれば、ログに受信したメッセージと相手先にReplyBufferで設定した文字列が表示されます。
